


It's time to get creative with the magic of wool felt! We're going to make our very own felt crown using the Filges Crafting Collection! Wool felt is not only soft and durable but also a joy to work with. It's the perfect material for crafting unique and beautiful crowns for little ones or special celebrations. With Filges' vibrant colors, you can let your imagination run wild and design a crown that’s as special as the person wearing it. Grab your felt and get ready to craft something truly enchanting!
Materials needed:
Wool felt sheets in various colors, sewing needles, embroidery thread or regular thread in different colors, scissors, ribbon or elastic, and a marker.
Gather your supplies and find a brightly lit area to start your crown.
Begin by holding a piece of felt against your forehead to measure the size you need. Mark the width and note where to cut the felt.

Choose the shape you'd like for your crown—wavy, pointy, or a simple rectangle—whatever you prefer!
Draw your crown shape with a marker or freehand it, and cut it out. This is your crown's base.
Take a second piece of felt and cut it to match the same shape as the first piece. Set this aside for later.
Now, let’s have some fun! Choose how you'd like to decorate your crown.
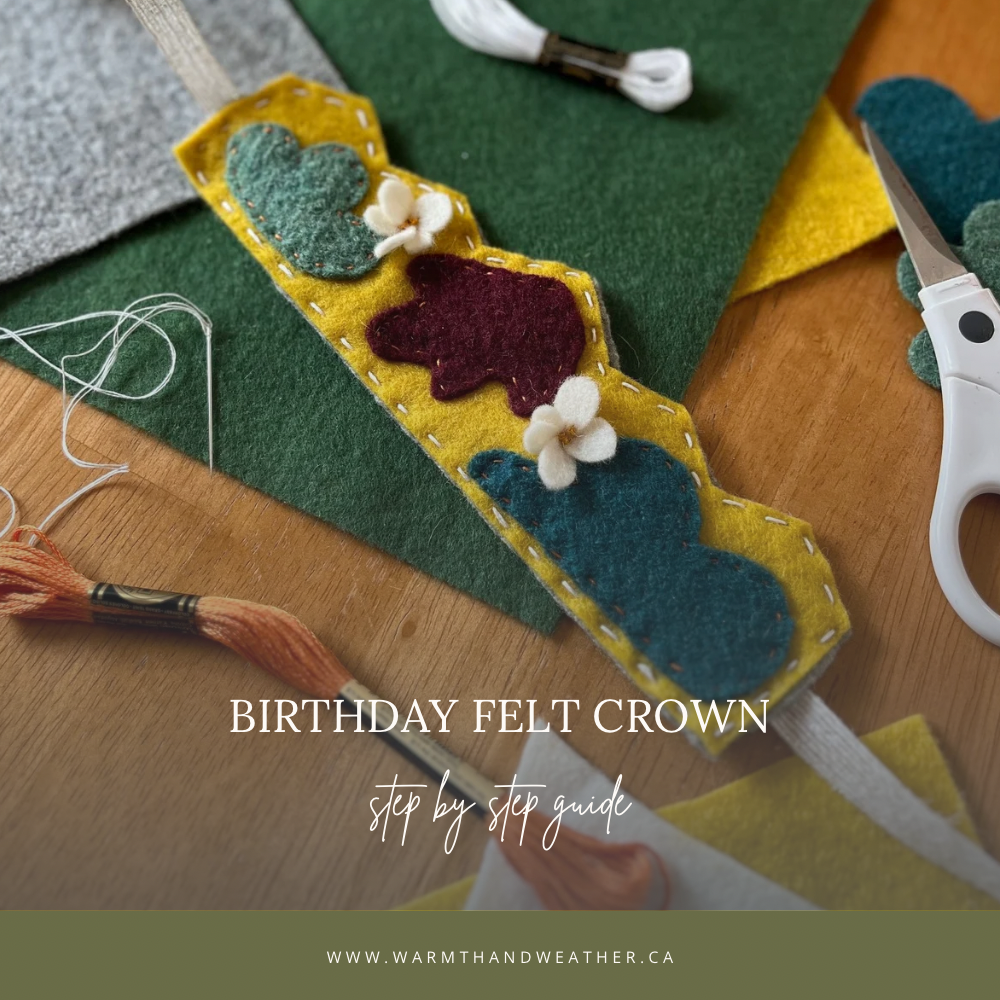
I decided to use pre-cut wool felt flowers, which I trimmed into smaller pieces to fit my crown (as seen above). I also cut out small circles, overlapped and sewed them together to create little flowers (as seen below). I finished them off by adding a few French knots to the center to complete the flowers. (Here’s a link on how to make a French knot).
Play around with shapes, layers, and colors to find the perfect design for your crown! For a birthday crown, cut out your age in stars or a big number.
Once you've decided where all your elements will go, it's time to sew them down. You can use embroidery thread or regular sewing thread—whatever you have on hand works! If using embroidery thread, I recommend separating the thread and using only 2 strands. I chose complementary colors to my felt for an extra pop of color.
To stitch your decorative pieces onto the crown, start by tying a knot in the end of your threaded needle. Then, insert the needle from the back side of the crown, pulling it through to the front, and go back through to the back side. Repeat this process until the element is securely attached. It's a super simple task, and older kids can do it with some supervision!

Once all of your decorations are sewn on, it's time to add the back piece of felt (the one we cut out earlier) and the ribbon or elastic.
Begin by sewing the backing piece to the back side of the crown in the same way you attached the decorations (weaving from back to front) until the entire piece is attached.
Next, measure two lengths of ribbon, making sure there's plenty of excess to tie a bow. Sew the ribbon to the sides of the crown, near your ears. Be careful to sew only through the back piece of felt, not the front decorated piece. Sew neatly, as the stitches will be visible from the back.
Once the ribbon is attached, you’re all finished!
Now, wear your crown with pride—whether you're dressing up, celebrating a birthday, or simply feeling extra special! We hope you enjoy following along, and please tag us when you share photos of your finished crowns. We can't wait to see them!
Blog and photos by Courtney Audette