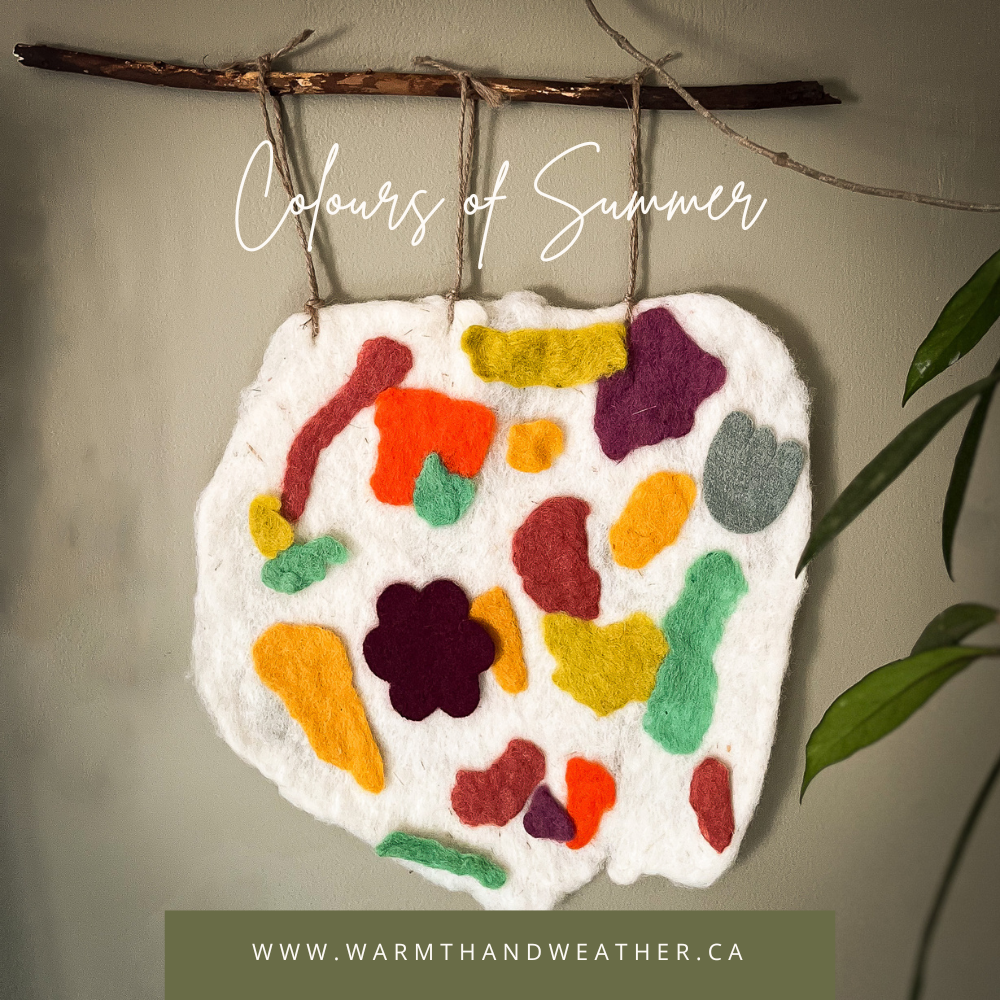
Si vous ne l'avez pas encore vu, nous avons lancé une nouvelle gamme de produits artisanaux ici chez Warmth & Weather ! La jolie Filges propose des couleurs vives de feutre de laine, de fibres et de fils, ainsi qu'une variété d'outils pour vous aider à démarrer votre propre voyage de fabrication de laine.
Pour célébrer et partager notre enthousiasme, nous vous proposons un projet d'artisanat à suivre que vous pourrez essayer ! Nous réaliserons une tapisserie murale en utilisant une technique de feutrage à passepoil pour faire adhérer la laine de fée à elle-même.
Comment fonctionne le feutrage humide, vous demandez-vous peut-être ? Dans le feutrage humide, les fibres de laine ont de petites pointes le long de la tige de chaque brin de fibre, puis par agitation - un processus impliquant de l'eau, du savon et un peu de frottement avec les mains - elles se fixent fermement les unes aux autres. Lorsque vous trempez la laine dans de l'eau chaude savonneuse, les fibres se détendent et s'ouvrent. Lorsque vous frottez et agitez la laine, les minuscules écailles des fibres s'accrochent les unes aux autres et s'emmêlent, formant un tissu épais et solide. C'est comme une transformation magique qui transforme une laine féerique légère et aérée en œuvre d'art !

Tapisserie murale étape par étape
Rassemblez votre matériel : du feutre de laine de différentes couleurs, du savon à l'huile d'olive, de l'eau chaude, un bol, un goujon en bois ou un bâton de plage, de la ficelle, des ciseaux, du film plastique, plusieurs torchons.
Déchirez de petits morceaux de feutre de laine coloré, au moins une douzaine si vous faites une tapisserie de 12 pouces x 12 pouces.

Remplissez une bassine d'eau tiède et assurez-vous d'avoir votre savon (j'aime utiliser une barre de savon à l'huile d'olive) que nous utiliserons pour feutrer la laine.
Plongez un petit morceau de feutre dans l'eau, faites-le mousser avec du savon et commencez à l'agiter entre vos mains. Le savon va mousser et ce n'est pas grave !
Continuez à déplacer et à travailler le feutre de laine entre vos mains et vos doigts, en le plongeant périodiquement dans l'eau chaude, jusqu'à ce qu'il devienne un morceau « solide » et plat. Répétez l'opération avec chaque petit morceau. *Il est important de garder l'eau aussi chaude que vous le pouvez, cela aide le feutre de laine !

Choisissez la couleur de laine de fond de votre tapisserie et étalez-la sur un torchon, avec un grand morceau de film plastique entre la laine et le torchon (faisant office de barrière entre l'eau et le torchon).
Placez vos petits morceaux de laine feutrée comme vous le souhaitez sur le grand morceau de laine de fond moelleux ! Créez un motif abstrait, un motif simple ou une image en utilisant les différentes formes que vous avez créées aux étapes 4 et 5.
Une fois que tous les morceaux sont là où vous le souhaitez, versez quelques poignées d'eau chaude savonneuse dessus et utilisez vos mains pour presser l'eau dans la laine. Cela prendra du temps et il est important de ne pas se précipiter. Nous voulons que les petits morceaux de laine commencent à feutrer pour former le grand fond.

Lorsque vous remarquez que les pièces commencent à se feutrer, prenez un deuxième morceau de film plastique et placez-le sur la tapisserie. Prenez un deuxième torchon et placez-le sur le film plastique.
Enroulez délicatement la tapisserie, le film plastique et le torchon ensemble, en poussant et en tirant d'avant en arrière au fur et à mesure, pour créer plus d'agitation entre les fibres de laine. Continuez ainsi pendant 5 à 10 minutes, en vérifiant régulièrement la tapisserie. Il peut être nécessaire de la repositionner dans le film plastique (c'est glissant là-dedans !).
Déroulez pour révéler la tapisserie entre le film plastique. Repositionnez le film plastique de manière à ce qu'il recouvre toute la tapisserie. À l'aide de vos deux mains, agitez la tapisserie entre vos mains en frottant assez vigoureusement, d'avant en arrière et en cercles. J'ai trouvé utile d'ajouter plus d'eau chaude savonneuse pendant cette étape, en continuant à agiter et à créer des frictions. Cela peut également être fait pendant 5 à 10 minutes. Vous saurez que vous avez terminé une fois que toutes les pièces seront attachées les unes aux autres !

Une fois que tous les petits morceaux de laine se sont feutrés pour former le fond, déroulez les torchons et retirez le film plastique. Prenez un torchon sec pour enrouler la tapisserie afin d'éliminer autant d'eau que possible. Soyez doux ici, car vous ne voulez pas trop étirer la tapisserie, ce qui vous ferait perdre votre motif/image.
Déroulez délicatement pour révéler votre jolie tapisserie murale en laine fabriquée à la main !
Pendant que la laine est encore humide, prenez une paire de ciseaux et faites quelques trous sur le dessus. Coupez quelques morceaux de ficelle et passez-les chacun dans leur propre trou que vous avez créé. Nouez-les en boucles.
Faites glisser les boucles sur votre bâton ou votre cheville en bois, et vous êtes maintenant prêt à accrocher votre œuvre d'art !
*Étape bonus : utilisez de la laine ou du fil pour broder des motifs originaux et contrastés sur votre tapisserie. Les nœuds français ajoutent de la texture, mon préféré !*
Visitez notre page Instagram pour une courte vidéo explicative !
Retrouvez ici tous nos produits Filges.

Article de blogue de Courtney Audette


